
It is accurate to say that everybody knows what a printer is – a device that puts information on paper. Fast-forward to the 21-century, and printers still have a place in the world. Although now, the most common form of a printer is one which prints information from the computer onto paper. There are a variety of printers available to do this including inkjet, laser and dot-matrix – the latter of which is no longer in common usage (thankfully).
In a similar way that the aforementioned computer printers print 2-dimensional information onto paper, 3-dimensional printers can create objects using plastic. This is done using a heated nozzle laying down layers of molten plastic in a pre-defined pattern. The layers (which are commonly a fraction of a millimetre thick) eventually build up into an object.
The difference between printing a 2-dimensional image on paper and printing a 3-dimensional object using plastic is that it is significantly more complex. A 3D object begins as a 3D model; this is essentially data representing coordinates of points in a 3D object. Much in the same way that a 3D cube would be represented using 8 points:
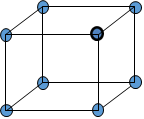
Figure 1: A 3D cube with points
A 3D model of an object, such as a person’s face would be substantially more complex than this. However, the principle should be the same. These 3D models can either be drawn using 3D-modelling programs such as Blender or scanned using dedicated devices. Discussed in this blog post is a way to create a 3D scanner for a fraction of the cost using an old Xbox 360 Kinect, a “Lazy Susan” bearing, some cardboard and a lot of patience.
| Required Hardware | Required Software |
|
| Optional Components |
|
The purchase of a 3D printer at Canterbury Christ Church University was an interesting prospect, which prompted some of us into thinking and investigating the concept further.
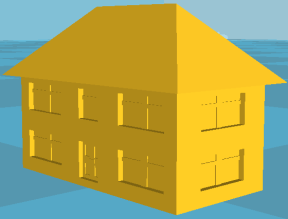
Firstly, the need to understand how to create one’s own 3D model and print it had become apparent. To do this one would need to create a 3D model using Blender. An exceptionally good set of tutorials for Blender Beginners was discovered (Lewis, 2014). After completing a few of the tutorials, the outcome was a simple 3D house.

Figure 2: A simple 3D house model
After learning about the complexities of Blender, things could get more ambitious … like the addition of window frames and other such details. Then what? We have a model; can it be printed? To do this, Cura was used, which analyses the model’s mesh to see if it is “watertight” (i.e., that there are no gaping holes that would result in compromising the structural integrity of the model.) Unfortunately, during the process of adding the small details mentioned earlier, a complete mess of the model’s mesh was made, which meant that it would not be a viable print. Here, a new model was created, keeping the same design and then exported the model to “.stl”. “X-ray view” (Figure 5) in Cura was used to check the viability of the model (problematic areas of the model would appear in red).
 |
 |
 |
|
Figure 3: Blender |
Figure 4:Cura (normal view) |
Figure 5: Cura (X-ray view) |
After gaining a basic understanding of how to create 3D models using Blender, it was then necessary to figure out how to scan objects, which would allow one to create models more rapidly. To do this, a Kinect was required.
The Microsoft® Xbox 360 Kinect is especially useful for scanning a 3D object as this is essentially its primary purpose. The Kinect It is used for games where the player interacts with objects on a screen using the Kinect’s multitude of sensors (Figure 6). It is therefore possible to use the Kinect’s depth, visual, infra-red sensors and microphones to plot out the geometry of an object.

Figure 6: Kinect for Windows 1.5, 1.6, 1.7, 1.8, (Microsoft, 2016)
Once a program had been written that allowed fine-tuning of the viewing angle of the Kinect, the time had arrived to try and scan something – (the author!) To do this, a program called ReconstructMe was used. The Kinect was set on a stand above a monitor where the author could scan his head. Sadly, to get a really good quality scan requires patience and a steady torso, neither of which, the author has. As a result, the final scan was not smooth, but it was sufficient. To hide the flaws of the scan and to experiment with the result, the model was exported the scanned to a “.stl” file and opened it in Blender. The material of the head was changed to a refractive blue glass, light sources and a matt background and a background were added. The result was then rendered (Figure 7).
Figure 7: A rendered image from the scanned model of the author’s head
With time, more patience and a better set-up a better scan of the author’s head would be easily achievable. However, the final objective is to scan an object.
To do this a rotating surface was required for the scanning subject to sit on and to try different software called Skanect. This allowed us to see inside the Kinect’s “field of vision”. Additionally, a rotating surface was constructed using a “Lazy Susan” horizontal bearing and two circles of cardboard. Moving forward, a model of a DeLorean (the car from the film Back to the Future) was used as a test subject. Once boundaries in Skanect had been set, the rotation of the platform could begin with the DeLorean on it very slowly. This proved tricky; first attempt was not good! Therefore, altering of the scanned model in Blender was done to make it look like melting wax (Figure 8) to hide the deficiencies in the model.
Figure 8: First object scan
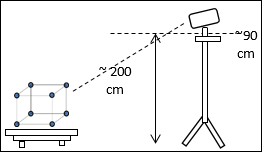
In the process of scanning the first object, it became apparent that further consideration needed to be put into the positioning of the Kinect and to automate the platform somehow.
 |
|
|
Figure 9: A Proposed Layout |
Figure 10: Kinect stand on a tripod |
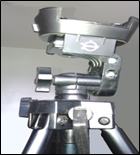
Numerous attempts were made to scan an object on the turntable with the Kinect mounted on the tripod. However, a viable scan was still not possible, this lead to the Kinect being held above the model in an attempt to scan it. With the model not on the turntable, it was not possible to scan half of the object. The resultant model, whilst of a tolerable quality (Figure 11) was still not good enough, as it was incomplete. Another problem that had manifested itself was that the free version of Skanect only exports a maximum of 50,000 polygons. This meant that the resultant model was of an even worse quality (think video games of the mid ’90s).
Figure 11: Coloured model in Skanect
Further investigation is required to discover how others have managed to scan models in this manner more successfully.
Please let us know, in the comments section, if you have managed to have a go at this and get a better result, or even print your result from scan using the Kinect!
We hope that you have found this information useful and have inspired you to try it out for yourself.
References
Lewis, J. (2014) Blender Absolute Beginner Series. Available at: https://www.youtube.com/playlist?list=PLrgQj91MOVfjTShOMRY8TLmkJ7OFr7bj6 (Accessed: 15 June 2016)
Microsoft. (2016) Kinect for Windows 1.5, 1.6, 1.7, 1.8. Available at: https://msdn.microsoft.com/en-us/library/jj131033.aspx (Accessed: 15 June 2016)
